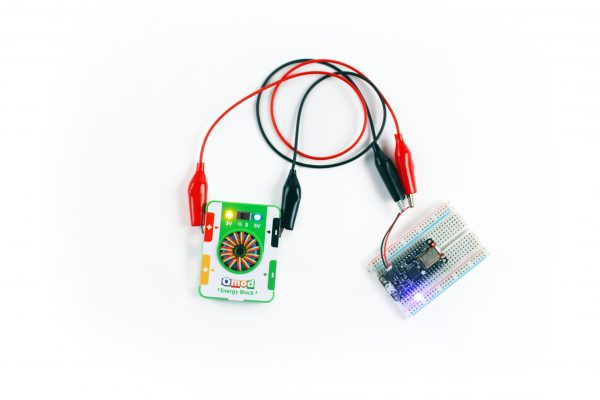
Coding with Qmod

Coding with Qmod

micro:bit

One of our favourite microcontrollers is the micro:bit! The micro:bit is an open source microcontroller designed by the BBC for computer education. It’s the size of a credit card and has a ARM Cortex_MO processor, accelerometer and magnetometer sensors, Bluetooth and USB connectivity, a display consisting of 25 LEDs, two programable buttons and can be powered with sustainable energy from the Qmod Energy Block.

Flashing the micro:bit

One of our favourite things to do with the micro:bit is create and run programs using the Qmod Energy Block for power. Before we can create programs, first let’s learn how to load a program or “flash” the micro:bit. To the right is a detailed video on how to do this. 


Monitor your Sustainable City

Once you have learned how to flash your micro:bit, click the link below to download a Voltage Meter program to flash to your own micro:bit. This program will allow you to monitor the voltage of your Qmod Energy Block with the micro:bit. Try using this with the Qmod Sustainable City Kit to monitor the energy usage of your Sustainable City!

Download Voltage Meter Program Here!

What Is Electricity?

Assembling the Qmod Hand Crank

Assembling the Qmod Hand Crank

How to use the Energy Block

How to use the Qmod Energy Block

INPUT

The Qmod Energy block has 4 magnetic terminals – Red, Black, Green and Yellow. Each one of these terminals has corresponding arrows indicating the direction of electricity in and out of the energy block.

The Yellow and Green terminals have arrows pointing in towards the centre of the Energy Block; this is the Energy Input. The Energy Input is where you connect your energy generating sources eg. solar panel, electrodes or hand crank. Yellow indicates positive and Green indicates negative, these correspond to the positive and negative connections from your energy source.

DISCOVER MODE

The Qmod Energy Block has 2 settings – Discover and Charge. Shift the switch to the left, towards the magnify glass icon, and you are in Discover mode. Discover mode allows you to test energy set ups and understand how much potential Voltage your energy source can charge to the Energy Block.

The two LEDs on the Energy Block will indicate how much voltage is being generated by your energy source. If the Yellow LED is illuminated then you have successfully charge your Energy Block to 3 Volts. If the Yellow and Blue LED lights are illuminated, then you have successfully charged your Energy Block to 5 Volts.


CHARGE MODE

Shift the switch to the right towards the battery icon and you are now in Charge mode. Charge mode allows you to charge your Energy Block with electricity generated from your energy source. 

The two LEDs on the Energy Block will indicate how much electricity is stored in your Energy Block. If the Yellow LED is illuminate then you have successfully charged your Energy Block to 3 Volts. If the Yellow and Blue LED lights are illuminated, then you have successfully charged your Energy Block to 5 Volts.

 OUTPUT

The Red and Black terminals have arrows away from the centre of the Energy Block; this is the Energy Output. Red indicates  positive and Black indicates negative, these correspond to the positive and negative connections to whatever you would like to power with your Energy Block. 

The Energy Block will power things in both discover and charge mode however, if you would like to see how much energy you are using, shift the switch to charge mode and refer to the LEDs. Again, take note of the LEDs, if the Yellow and Blue LEDs are illuminated you still have 5V of electricity. If you just see the Yellow LED then you have used almost half of your electricity and have 3 Volts of electricity left in your Energy Block.